
Wednesday, November 30, 2011
My First "Guest" Blog Post
I am so excited to share my first "Guest" blog post with all of you. Michael Larsen, owner and founder of Tula's CocoKefir, invited me to post about our journey with our son from a health care perspective and the lessons we have learned along the way. My hope is that by telling our story, we inspire other parents to think outside of the status quo when it comes to their child's health care. Please pass this on to anyone who you think may benefit! Click here to read the post!
In addition, I am a huge fan of Tula's CocoKefir and CocoYo (my little guy loves both!) - you can find their products at many Twin Cities' grocery stores and almost all Co-ops in the area.
Sunday, November 27, 2011
Menu Plan Week of 11/28/11
I hope everyone had a wonderful Thanksgiving! We had a great time in Milwaukee with family and friends. I am ready to get back into the swing of things this coming week! I have some yummy recipes on the menu.
I know many who look at this blog are working with special diets in their families, or maybe you are looking to cut back on gluten, dairy, etc. for your own health benefit. If you ever have questions about what to substitute if some of the ingredients in these recipes are on your "off limits" list, please let me know. I would love to help you! Comment here or send me an email.
In addition to my dinner plans below, I may attempt to make these zucchini pizzas this week. Awesome, kid friendly idea. We'll see if my little guy has interest, he's not a huge zucchini fan. But maybe as a pizza he'll take interest..... :)
This week's menu:
Monday: Black Bean Sweet Potato Quesadillas with a spinach salad
Tip: Prep the filling the night before. While prepping the filling, make a large batch of quinoa (see Tuesday's plan) for the meatloaf and to freeze for other dishes!
Tuesday: Quinoa Turkey Meatloaf with salad
Tip: Prep quinoa in advance (I make a big batch and freeze in 1.5 cup portions) and saute all veggies and cooked quinoa the night before.
Wednesday: Leftovers
Thursday: Tater Tot Hot Dish with broccoli
My husband's most favorite childhood meal - I have promised time and time again that I would make my own version of this. So, I am making some changes tot he recipe link here. I will use Alexia Foods Sweet Potato Puffs and this condensed chicken soup recipe to make this (I have not used canned condensed soup for a very long time, see this link for a little bit of good information as to why it is no longer good for anyone to be consuming it and more information on substitutions. In addition, my little guy cannot eat it). No fried onions, either. Maybe a little cheese sprinkled on top? Sub in 1 lb. of grass fed beef for the 1.5 lbs. it calls for. I'll post results.
Tip: Batch cook the condensed soup and freeze for a variety of dishes! Brown hamburger the night before.
Friday: Leftovers with a big green salad
Saturday: Quinoa Stuffed Bell Peppers
Tip: This takes some time to make and assemble, a good Saturday or Sunday meal - SO delicious and great left over!
Sunday: Out
For more menu planning inspiration, check out Monday's post on Orgjunkie's blog!
Saturday, November 19, 2011
Allergy-free Thanksgiving Recipes

To assure that you have some delicious allergy-free options on your Thanksgiving table, I have sifted through many recipes to come up with this meal. I would love to hear about some of your favorite recipes - email me or, better yet, post your recipe links as comments below this post!
Happy Thanksgiving!
Crock Pot Turkey
Turkey breasts - so much easier than turkey and keeps your oven free for all of the wonderful sides!
Allergy-free Sausage Stuffing
This recipe is excellent, as it gives a variety of options depending on what your allergies are!
Cranberry Pumpkin "Ketchup"
My new favorite holiday recipe and an amazing substitute for cranberry sauce!
Green Bean Casserole
No canned soup here! It says it is dairy and soy free, but the recipe calls for butter. Try ghee if you are dairy-free. Instead of fried onions, sub in 1/4 cup GF or panko bread crumbs that are mixed with 1 tbsp. of olive oil and sprinkle that on top and bake as directed (5-10 minutes at the end with breadcrumbs on top).
Honey Roasted Sweet Potatoes
As simple as it gets and no marshmallows! :)
Pear Pumpkin Crisp
See the November 3rd post!
Pumpkin Rice Krispie Balls (allergy-free)
We will be having these on Thanksgiving Day! So cute and delicious!
Wednesday, November 16, 2011
Cooking with Your Child: Allergy-free Granola Bars!
As you may know if you read this blog, I decided last spring to dump almost all processed foods from our cupboards and dedicate time and energy to make those foods we were accustomed to in processed form from scratch. This is, of course, a work in progress. Don't overwhelm yourself, it does not happen overnight! Take baby steps. For us, the first things to go were cereal and granola bars. Granola and granola bars are an awesome, kid-friendly snack, so I had to find a homemade version right away. I researched many recipes that were allergy free and concocted my own granola bar recipe from there. I am continuing to tweak it but I think I have a good thing going! My little guy loves them!
I try to involve my two year old as much as possible in the kitchen! The more I involve him, the more interested he is in trying new things. Even if this means dumping the chopped vegetables or a cup of beans into the slow cooker and stirring, he is much more likely to eat what I am making! Once it is ready for a taste test, I try to make a big deal out of giving him a taste, he loves that!
This granola bar recipe is an awesome one to get your toddler or young child involved with! I would love to hear about your experience involving your child in making this recipe if you decide to try it. What other recipes do you find to be great for involving your child? Please share!
Here are some of my tips for involving your child in the kitchen:
1. When involving your child, especially toddlers, find a simple recipe that takes less than 15 minutes to prepare.
2. Don't bake when they are hungry! I find it best to make this recipe with my little guy right after snack or after lunch.
3. Let them get messy! I put a bib or smock on my little one when we cook together. But, let's be honest, that only protects his clothes, not the floor, chair, counter, etc.
3. Especially for toddlers, only bake recipes that are safe for taste testing.
3. Give him/her a spoon for tasting. (Or multiple spoons). After my little guy stirs the granola, it is his instinct to stick the spatula right in his mouth. I have a spoon on the ready and swap it with him so he can have a taste. Sometimes, I will have a few spoons ready so that he can taste the ingredients as we go. Then there is less inclination to taste right from the bowl!
(Sorry that there are no pictures of this process - there was no way the camera would have survived without honey and Sunbutter dripping all over it!)
Granola Bars
Ingredients:
3 cups old fashioned rolled oats
1/2 cup sunflower seed butter (can use smooth peanut butter if there is no nut allergy)
1/2 cup honey (ideally, locally produced raw honey!)
1/3 cup raisins, chopped
1/4 cup ground flax seed
Optional add-ins: other dried fruit, nuts or seeds, chocolate chips (Enjoy Life makes allergy-free mini chips!), mashed banana or pumpkin, other spices like cinnamon, allspice, cloves, nutmeg. Make this recipe your own! :)
Directions:
Preheat oven to 350.
Combine all ingredients into a large mixing bowl until completely combined. Dump the granola mixture onto a baking sheet lined with parchment or a silpat (or very well greased with coconut oil) and firmly press down until even (it will not cover the whole baking sheet, double the recipe to cover)! Pressing the mixture down will allow you to break it into large chunks.
Bake for 15-20 minutes until brown around the edges.
Let cool and break into large pieces. Refrigerate or freeze granola "bars" until ready to eat!
This will be posted at:
Lunchbox Love Fridays at Vintage Cookery
Allergy Friendly Friday
Sunday, November 13, 2011
Menu Plan Week of 11/14
Happy mid-November! Can you believe it?! It is hard to believe that we are so close to Thanksgiving and then the holiday season is in full swing. This is my favorite time of year, especially now that we have a two year old to share our traditions with! I hope to do a feature this week on healthy, allergy friendly recipes for Thanksgiving. We are having a very small Thanksgiving celebration this year at my parents' house with only my family and my Mom and Dad, so the food allergy challenges are all but eliminated - between my Mom and I, we are planning a very basic holiday dinner that will allow our little guy to enjoy almost every dish. For those who may have to contend with larger celebrations that make it more difficult to accommodate, I hope to suggest some recipes to you that everyone will love.
This week, we received the results for our little guy's two year allergy testing. We tested more potential allergens this time and it definitely painted a broader picture of what we are working with. I have not seen the report but received a very quick briefing from our pediatrician (she will mail us and his allergist the results). Eggs, peanuts, walnuts and sesame seeds were high (meaning highest risk for a major reaction, i.e. Epipen always at the ready) and wheat and soy were at the lower end. Walnuts and sesame seeds are new to the list, although I had eliminated all tree nuts and suspected a sesame allergy. There was small positive for corn but since he eats corn often (tortillas, cornbread, etc.) with no reaction, we don't need to worry about it. He also tested positive for dog, cat and trees and very low for pollens and grass. Our poor guy! It is obviously a reminder of how vigilant we have to be and that this is most likely a challenge that we will be faced with for quite awhile. He might have to contend with egg and nut allergies for a lifetime.... for an "Allergy Mom" like me, I have learned not to think with a big scope and to manage through this on a daily and weekly basis (the motivation for this blog!) to keep myself from feeling overwhelmed. We will see his allergist in early December to review the results further and to ask questions - more to come.
This being said, the good news is that I have learned to cook without these foods and it is awesome to think of the progress we have made with his health and wellness since we first discovered many of these allergies one year ago!
Menu plan for this week:
Monday: Pasta with marinara sauce and GF Turkey and Vegetable Meatballs
Tip: Prep veggies the night before.
Tuesday: Out
Wednesday: From last week... never got to it! Slow Cooker Beef Stew (sub in GF flour if needed, I will omit potatoes... you can use fresh potatoes, they will turn out fine!) and a side of rice and green beans
Tip: Prep crock pot the night before
Thursday: Slow Cooker Chicken and Wild Rice Soup (my own version - allergy free!)
Tip: Prep all ingredients the night before, add all but broth to the slow cooker. Dump broth in before work and plug it in!
Friday: Quinoa Burgers with roasted carrots and parsnips, salad
Tip: Prep burger mix the night before in the food processor. Chill mixture right in the processor bowl, make patties right before frying them up!
Saturday: Happy birthday to me! (I don't know what we will be doing, but I don't plan to cook!) :)
Sunday: Leftover meatloaf burgers (see this post), squash and green beans
For more menu planning inspiration, visit Orgjunkie's blog on Monday morning!
Slow Cooker Chicken and Wild Rice Soup
I LOVE creamy chicken and wild rice soup! I am making a standard chicken soup in the crock but adding a little "creaminess" at the end. (I used a few basic recipes to create this one, so this will be new for me this week, as well!) I may sneak some organic butter into this but avoid all other dairy (my little guy is not allergic to dairy but we avoid it for the most part due to his asthma, as dairy can be an irritant to this condition or for anyone that has a cold or flu bug, for that matter!) If you cannot do any dairy, sub in ghee or a another DF butter substitute. OR just eat this without the roux/milk mix added at the end for a classic chicken and rice soup. I will update this post with photos and the taste result, would love to hear if you try this during the week, as well!
Lunchbox idea: This is brilliant. Freeze soup in 8 oz. mason jars and defrost overnight before adding to a thermos for your family's lunches! Perfect! (Other awesome lunch packing tips here, too).
Note: For a richer soup, double the butter, flour and milk amounts. I just want a touch of creaminess so I am keeping it lighter.
Ingredients:
6 cups chicken broth (I use homemade bone broth)
2 chicken breasts (I use shredded chicken from the freezer)
2 tsp salt, divided (I use Real Salt) plus more to taste (adjust depending on the broth that you are using!)
1/2 cup wild rice
1/2 tsp pepper
1/4 cup (approx) GF all purpose flour (we use Bob's Red Mill)
1/4 cup unsalted organic pastured butter (1/2 stick)
1 cup (approx) coconut milk
1 cup diced carrots
1 cup diced celery
1/2 cup diced onion
Directions:
Combine broth, 1 tsp salt, carrots, celery, carrot, onion, chicken and rice in a large slow cooker. Cook on low for 6-8 hours or on high for 4 hours. Take out chicken and shred with two forks (if not already shredded) and then add back into slow cooker. In a small bowl combine salt, pepper, and flour. In medium saucepan over medium heat, melt butter. Stir in flour mixture by tablespoon until a roux forms (a thick consistency). Whisk in coconut milk, a little at a time, until fully incorporated and smooth. Stir cream mixture into slow cooker and then let cook on low for 15 more minutes.
Linked to Sunday Night Soup Night!
Linked to Traditional Tuesdays
Wednesday, November 9, 2011
Baking Frenzy
I recently had the opportunity to meet Holly Larsen, the Co-founder of Tula's CocoKefir. My family had been a fan of this product for quite some time (we love their new CocoYo too!). Their story is inspirational. Holly and I have been sharing some kid-friendly snack ideas since then. She gave me this granola/cereal recipe to try and it was a big hit in our house with my little guy and I! I would liken it to vanilla-infused grape nuts - crunchy and a little sweet. Wonderful sprinkled on yogurt, oatmeal or brown rice cereal or with a little bit of milk or coconut milk poured over it! I love the fact that I had the opportunity to use some ingredients that I had never tried before in this recipe - buckwheat groats, quinoa puffs and vanilla stevia (I used the Sweetleaf brand - it is worth it to buy the good stuff with no additives, as a little goes a long way... there are hundreds of servings per tiny bottle! I am excited to continue baking with it and look forward to adding few drops to flavor tea, coffee, etc. as well!)
(Thanks to Holly Larsen for this recipe!)
Ingredients:
- 1.5 cups soaked buckwheat groats (find these in the bulk section at your Co-op or Whole Foods)
- 3 cups quinoa puffs (From Nuts Online - just received them in the mail and they are awesome, a great add-in for any granola recipe or as a cereal substitute on its own! Note that they are tiny - just tiny puffed quinoa "grains")
- 4 tbls coconut oil
- 1 tbls ground chia seeds mixed with 1/3 cup warm water (you can also find these in bulk!)
- 30 drops vanilla stevia (find this in the baking aisle at Whole Foods or your Co-op - a few drops go a long way, great to flavor beverages, too!)
- pinch salt
Soak buckwheat groats in water overnight. Drain and rinse. Bake soaked buckwheat groats at 325 degrees for 20 minutes baking sheet (lined with a Silpat or parchment) to dry out. In the meantime, let chia seeds soak in water and melt the coconut oil. Mix chia mixture with stevia. Mix chia/stevia mixture and coconut oil with dry ingredients. Spread on parchment/Silpat lined sheet and bake 40 minutes stirring periodically. Cool completely and store in airtight container. Serve like cereal or sprinkled on yogurt - or as a snack all by itself! :)
 |
| The ingredients: chia seeds (small clear bag, quinoa puffs (blue bag), groats (big clear bag), coconut oil and Sweet Leaf Vanilla Creme Stevia. |
 |
| Before baking |
 |
| After baking, crunchy and just the right amount of sweetness. Made our house smell wonderful! |
 |
| Sprinkled on yogurt - the little guy LOVED it. :) |


Tuesday, November 8, 2011
All About Beans!
Beans are a critical part of my families' meals - lunch and dinner - on a weekly basis. Beans are an awesome way to quickly add fiber and protein to your family's diet. If you are looking to bump up the nutrition content of your families meals, beans are by far the most affordable way to go.
I used to be a fan of canned beans - quick and easy. But I never really loved their flavor and consistency. For some reason, cooking my own beans was a little daunting to me.
 Then I learned about the benefits of soaking and cooking your own beans (learn more about why you should soak your beans here.) When I discovered that I can prepare them in my crock pot, I was sold! As an added bonus, they taste so much better and their texture is what you would expect from a bean (i.e. not mushy!)
In addition to all of this, organic beans purchased in the bulk section of your favorite Co-op or grocery store are incredibly inexpensive. One pound of cooked bulk beans costs under $3.00 (as low as $1.30/lb when on sale at my co-op!) and is equivalent to 7 cups (or 4 cans) of beans!
Soaking your beans: Per the directions in the link above, you can boil the beans for 2-3 minutes, cover and leave overnight to soak. I use a big 6 quart crock pot, rinse the beans, pour them in, fill it with water and leave it overnight on the WARM setting.
Cooking beans: Drain the beans after soaking and rinse them thoroughly. Rinse out the crock put and wipe it dry with a paper towel. Add the beans back into the crock pot and fill with water (fill until beans are completely submerged in the water). Cook on LOW. Our favorite beans to cook are garbanzo (chick peas) and black turtle beans. The garbanzo take about 6-7 hours and the black turtle take 4-5. After they are cooked (take a taste test to make sure they are done to your liking), drain and rinse with cool water. Let them cool completely.
Here is the best part - you can freeze the beans in can-size portions to use for cooking later. As I mentioned, they have a great texture (and are sodium free) - freezing them does not impact their flavor or texture, in my opinion. I freeze them in 1-2 can potions (1 can = 1.5 cups cooked)
My little guy loves beans. Here are some great ideas of what to do with all of the beans that you have on hand!
- Eat them as-is! I serve these as a snack (great for on-the-go)! Sometimes I will mix them with grass-fed sausage sticks or even as a side dish with lunch on their own.
- Use them in burgers like these and these.
- Roast them for an awesome, crunchy snack! Check out the recipe here.
- Add them to cold quinoa and rice salads, crock pot chili, soups, or make this Moroccan Chick Pea recipe.
- Make them into hummus. Pack the dip in a container for school lunch or serve a big bowl with raw veggies for a super healthy snack. Two great recipes (season to taste - remember these beans have little to know sodium content):
- Black Bean Hummus
- Basic Hummus (I sub in extra olive oil for tahini until I get my desired consistency, my son reacts to sesame,a lthough I can't say if it is an intolerance because we have not had him tested for sesame). You can add all sorts of things to bump up the flavor of this recipe, including roasted peppers/zucchini/eggplant, extra lemon, some seasoned breadcrumbs, etc.
- Use in quesadillas and or as a side dish with tacos, etc. Almost all of my quesadilla recipes include beans! (One easy side dish idea: warm up 1.5 cups of black beans (1 can equivalent) with 3-4 tbsp of salsa and 1.5 tsp cumin and salt to taste - YUM!)
Saturday, November 5, 2011
Menu Plan Week of 11/7/11
Hello, all! I hope you had a great week and that you are enjoying your weekend! I will try to be better about mentioning my recipe highlights from the prior weeks menu plan. Last week's menu included an incredible Autumn Sausage Casserole that I made in my slow cooker (per the recipe). Taiha Wagner from Just One Bite (where I contribute recipes, articles, my blog links, etc.) mentioned that she made it right in a pan on the stove and it turned out wonderful. So, you can't really go wrong! I highly recommend that you work it into your menu plan in the coming week or two, you will see it here frequently this winter. It is a wonderful, healthy comfort food and will make your house smell amazing.
Here's the plan for the coming week! A few old reliables and a few brand new recipes! I am interested to try the chicken nuggets and see what Ben thinks, as he has never had them before!
Monday: Crock Pot Chicken Chili (allergy free, I will use garbanzo beans and shredded chicken that I froze last week after cooking a whole chicken) with side of roasted broccoli
Tuesday: Roasted Vegetables with Pasta and Bacon (I may use sweet potato in place of squash, Brown Rice Pasta)
Tip: Reserve a couple of slices of bacon from the weekend (an excuse to make bacon on the weekend!), prep vegetables for roasting the night before and mix together in a Ziploc OR roast them the night before if needed!
Wednesday: Breakfast for dinner - Oatmeal Bake with breakfast sausage
Tip: To make this allergy friendly, I sub in Ener-G egg replacer, plain coconut milk for milk and coconut oil for the butter. I do not add any nuts.
Thursday: Chicken Nuggets with broccoli and sweet potato fries (if I have time, I may make the BBQ sauce that she refers to in the post!)
Tip: Per the blog post for the chicken nugget recipe, you can cut chicken in to chunks, toss with flour mixture and stick them in the freezer. Take them out and bake when needed!
Friday: Slow Cooker Beef Stew (sub in GF flour if needed, I will omit potatoes... you can use fresh potatoes, they will turn out fine!) and a side of rice and green beans
Tip: Prep crock pot the night before
Saturday: Out
Sunday: Crock Pot Chili (scroll down for recipe) with Kale Chips and Cornbread (thanks to a recommendation from a fellow "allergy Mom" I will be using Bob's Red Mill cornbread mix to make this.
Tuesday, November 1, 2011
Cranberry Pumpkin Ketchup
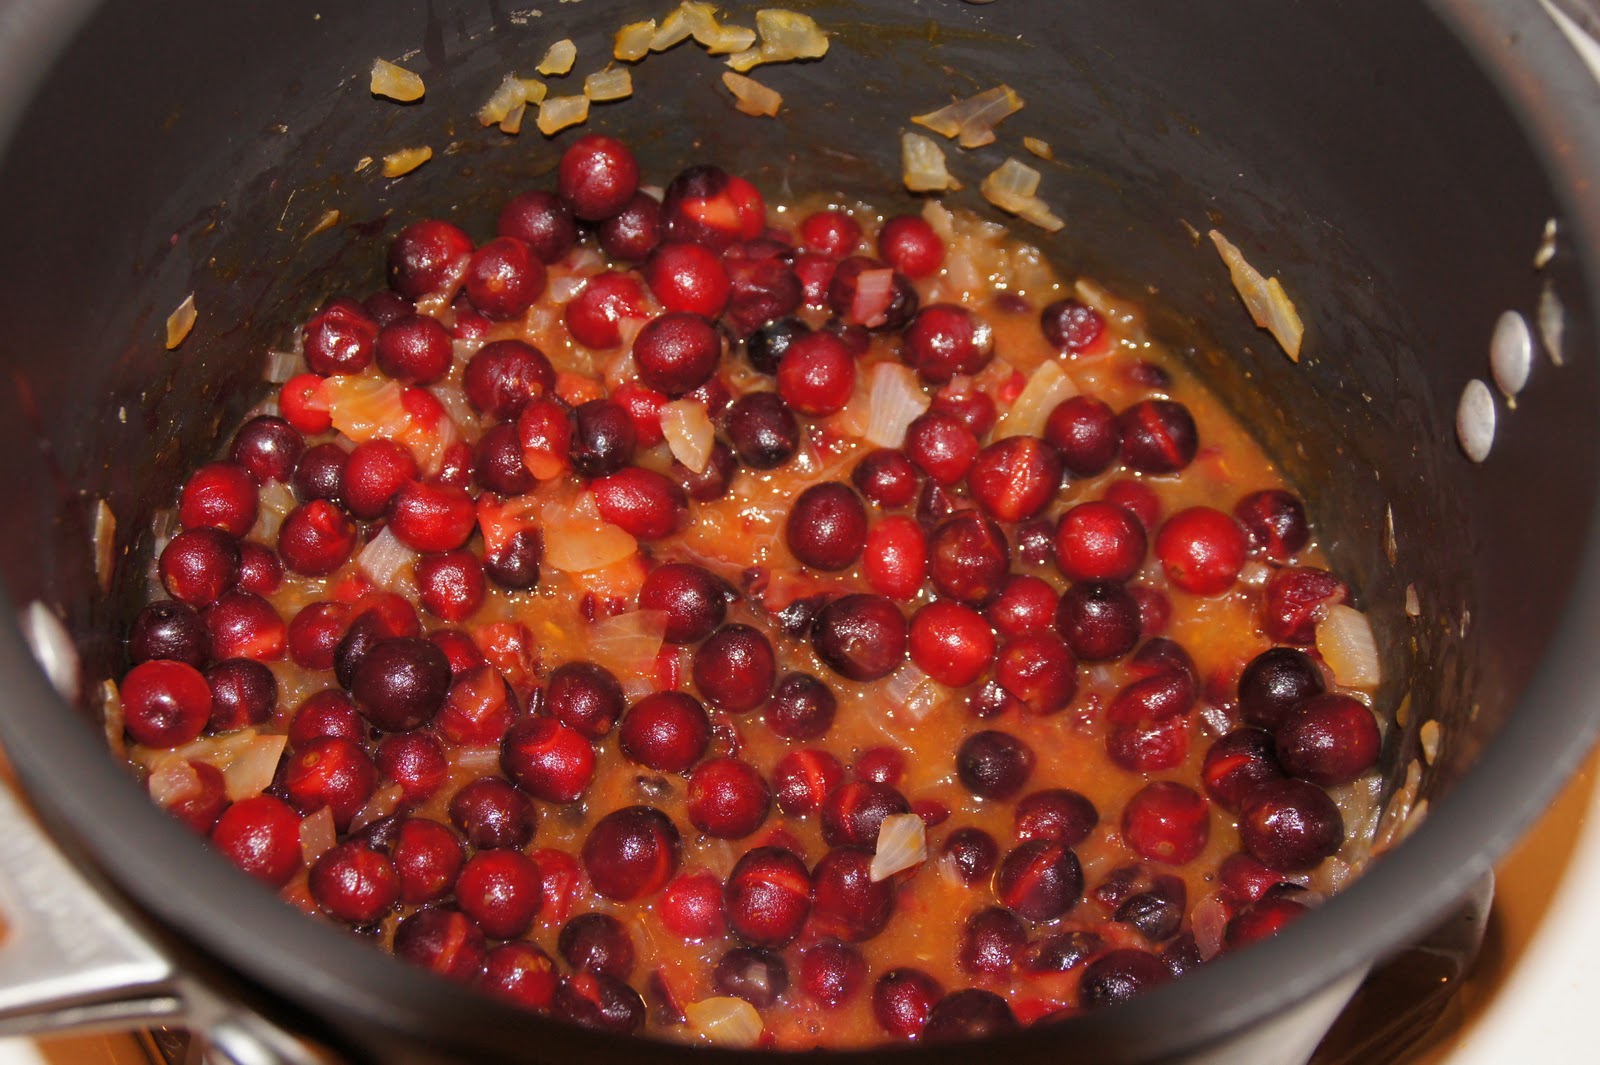 Since eating at Wise Acre Eatery last Thursday with a group of Just One Bite readers, I have been thinking about the wonderful cranberry pumpkin "ketchup" that they serve there as a side with fries and burgers. It was so flavorful and unique - almost like a mix between ketchup and chutney.... I just had to try to recreate it! As the mother of an extremely busy toddler to chase around, I don't have time to hang out and create gourmet sauces to compliment my meals. This was definitely a special circumstance. It is sometimes a miracle that I am able to put a healthy, well rounded meal on the table each day, much less condiments to compliment them! With that being said, I am not an expert in creating sauces, chutneys, etc. so this was relatively new to me. What I created was absolutely delicious (I must say, I was rather impressed with myself and with how easy it really was) but a bit different than what we ate at Wise Acre. The recipe that follows (along with some pictures) is much more like a ketchup than a chutney, but has the same flavor profiles as what I experienced last week. If anything, I think this recipe is a bit more "kid-friendly" - my little guy loved it! This makes a generous 2.5 cups of sauce. Because it is made with vinegar, it will keep in your fridge for one month! (I stored my leftovers in a mason jar).
This would make a wonderful (and affordable!) gift for your Thanksgiving Day host/hostess. It definitely has a spot on the table with your Thanksgiving dinner, as well - I would love a scoop of this savory "ketchup" next to my turkey in place of any cranberry sauce! It is also a wonderful everyday replacement for your standard ketchup, use it as a sandwich spread, scoop it over baked brie for a holiday gathering or use it as a dip for baked sweet potato fries. Lots of possibilities! As an added bonus, it has loads more nutritional value and a unique flavor that is perfect for fall.
If you do not have one already, I highly recommend that you pick up a hand blender for recipes such as this one (also wonderful for making blended soups... saves tons of time in both prep and dish cleaning!)
Cranberry Pumpkin Ketchup
Ingredients (preferably organic ingredients!)
3 cups (12 oz bag) fresh cranberries
1 small to medium sweet yellow onion, diced
3/4 cup water
3/4 cup apple cider vinegar
3/4 cup pumpkin puree
2 tsp. grated orange zest PLUS 1 large piece of orange zest PLUS juice of this orange
2 tsp. grated ginger PLUS 2 one inch pieces of ginger
3/4 cup whole cane sugar (aka rapadura)
1/2 tsp. cinnamon
1/4 tsp. nutmeg
1/4 tsp. allspice
1/4 tsp of salt (may need more to taste)
Directions
- Rinse cranberries thoroughly. Set aside to drain.
- In a medium to large saucepan, add water, apple cider vinegar, 2 one inch pieces of ginger and the onions. Bring to a simmer and simmer until onions are tender (10 minutes uncovered).
- Add juice from the orange, pumpkin puree, all orange zest and grated ginger, stir to combine with onion mixture.
- Add cranberries, simmer uncovered until the berries begin to pop and soften (approx. 10 minutes).
- Remove large ginger pieces and large piece of orange zest.
- Puree with hand blender (or in a food processor) until it reaches desired consistency.
- Add whole cane sugar, cinnamon, nutmeg, allspice and salt. Mix well and warm through on low heat.
- Serve warm or cold.


 |
| Served here on a turkey burger (burger recipe from this week's menu plan)! |
This will be linked up with:
Food Allergy Fridays
Healthy 2day Wednesdays
Fresh Bites Friday
Allergy Free Vintage Cookery Lunchbox Love
Subscribe to:
Posts (Atom)